Drift — finding asteroids, comets and variable stars

Drift finds moving objects in a series of astronomical images in FITS format. The program calibrates and aligns the frames and searches them for asteroids and comets, including ones too faint to be seen on a single frame. It identifies what it finds against the JPL database of known small bodies and makes an animation of every candidate, so it is easy to check by eye.
You can work in a browser (a local web interface) or from the command line. The interface, hints and log are available in English or Russian (русская версия этого описания — README.md).
The screenshots show a synthetic test series: 31 frames, a comet, several asteroids, a simulated JPL response. With your images the interface looks the same.
What the program does
- Calibration. Subtracts darks, divides by flats (with dark flats) and removes hot pixels. Color cameras are processed with a 2×2 superpixel.
- Alignment. Registers the frames on stars: shift, rotation, distortion (polynomial up to degree 5). Handles a meridian flip and frames from several nights.
- Frame review. Before the search you can flip through the aligned frames as in a blink comparator and exclude frames with clouds, light pollution or trailing.
- Asteroid search.
- Bright objects are found on single frames.
- Synthetic tracking (trying velocities and stacking frames with a shift) finds objects 1–2 magnitudes fainter than what is visible on one frame. On an NVIDIA graphics card with CUDA installed it runs tens of times faster (see Computing on an NVIDIA GPU).
- Comet search.
- Fast comets are found from differences between parts of the night.
- Slow comets (whose coma moves less than its own size during the night) are found by the shift of the nucleus.
- If the regular search found the nucleus, the program checks whether it has a coma.
- Several nights. Tracks of one object on different nights are linked into one object.
- Astrometry. Plate solving with ASTAP. If ASTAP fails, there are built-in solvers: with the installed ASTAP star database (no internet), with the Gaia DR3 catalog, and astrometry.net. The coordinates are then refined with the ASTAP database or Gaia DR3 to a fraction of an arcsecond, taking distortion into account.
- Identification of known objects. Asteroids and comets in the field are queried from JPL Small-Body Identification for your observing site. If the search did not find a known object, the frames are stacked along its predicted path, so you can see whether it is in the images at all.
- Report.
- An overview image of the field with labeled objects.
- CSV tables: candidates, individual detections with RA/Dec coordinates, known objects.
- An animation (GIF) of every candidate.
- Variable stars — an experimental feature, off by default; described at the end.
What you get
After the search the results folder contains:
| File | Contents |
|---|---|
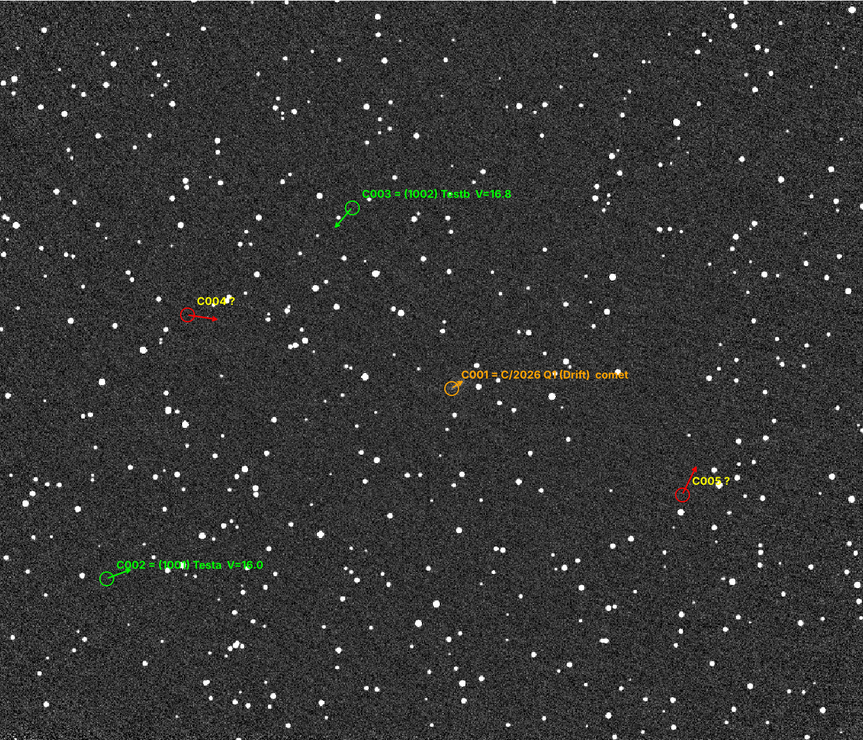
overview.png | Field overview. Green labels are identified known objects, yellow-red — new candidates, orange — comets, dashed light blue — known objects the search did not find. The arrow shows the direction of motion over the night. |
C001.gif, C002_433_Eros.gif, … | Animation of each candidate: a cutout from every frame with a circle on the object, and a last frame — the stack along the motion (shift-and-stack) with its SNR. If the object is identified, its name is part of the file name. |
candidates.csv | Candidates. For each: night, number of frames with the object, start and end positions, speed (px/h and ″/min), position angle, RA/Dec, frame and stack SNR, detection method, type (asteroid/comet), coma size, identification (name, V, offset from the prediction). |
detections.csv | Position of each candidate on each frame: UTC time, x/y, RA/Dec, flux, SNR. Useful for an astrometric report. |
known_objects.csv | Known objects in the field according to JPL. For each: V, positions, the matching candidate, and for those not found — the SNR of the stack along the prediction. |
known_*.gif | Animations of known but not found objects (if enabled). |
static_stack.fits | Median stack — the «static sky», with WCS if the field was solved. |
log_prepare.txt, log_search.txt | Preparation and search logs (when run from the interface). |
_session/ | Prepared frames. Deleted when the interface is closed. |
Installation and launch
Drift is distributed as a ready-to-run program: you do not need to install Python or anything else. Choose the archive for your system:
| System | Archive | NVIDIA GPU |
|---|---|---|
| Windows 10/11 x64 | Drift-windows-x64.zip | yes, if CUDA 12 is installed |
| Debian 12+, Ubuntu 23.04+ (x86_64) | Drift-linux-x86_64.tar.gz | yes, if CUDA 12 is installed |
| macOS, Apple M1–M4 | Drift-macOS-arm64.zip | no, CPU only |
There is one program per system. Without a GPU it computes on the CPU, and nothing else needs to be installed. To compute on an NVIDIA GPU, install the NVIDIA driver and CUDA Toolkit 12.x — see Computing on an NVIDIA GPU.
Windows
- Extract the whole archive to any folder, e.g.
D:\Programs\Drift. The program will not run from inside the archive. - Double-click
Drift.bat. A window with the work log and a browser with the interface will open. - To quit the program, close that window (or press Ctrl+C in it).
On the first launch Windows SmartScreen may warn about an unknown publisher: the program is not signed
with a certificate. Click «More info» → «Run anyway». If an antivirus blocks drift.exe, add the Drift
folder to its exclusions (this happens with programs built with PyInstaller).
Debian / Ubuntu
tar xzf Drift-linux-x86_64.tar.gz
cd Drift-linux-x86_64
./drift.sh              # interface in the browser; to quit — Ctrl+C in the terminal
./install.sh            # optional: an application menu icon and the drift / driftfinder commands
macOS (Apple Silicon)
- Extract the archive, e.g. into «Applications».
- The first time, right-click
Drift.command→ «Open» → «Open»: the program is not signed, and macOS blocks a plain double click. After that you can launch it with a double click. If macOS does not let you open it: «System Settings» → «Privacy & Security» → «Open Anyway». - A Terminal with the log and a browser with the interface will open. To quit — Ctrl+C or close the Terminal window.
On a Mac the computation runs on the CPU: the Mac GPU is not used.
Computing on an NVIDIA GPU
Without a GPU everything is computed on the CPU. An NVIDIA GPU speeds up synthetic tracking — the longest part of the search — tens of times. The program is the same, but you install the driver and CUDA yourself:
| What you need | Version |
|---|---|
| NVIDIA GPU | GeForce GTX 900 (Maxwell) or newer: GTX 10xx and 16xx, RTX 20xx–50xx, professional Quadro / RTX |
| NVIDIA driver | at least 527.41 (Windows) or 525.60.13 (Linux); a recent one is better |
| CUDA Toolkit | 12.x — 12.0–12.9 are supported, 12.9 is recommended. GeForce RTX 50xx needs 12.8 or newer |
CUDA 13 is not supported: the program needs the CUDA 12 libraries. If you already have CUDA 13, install 12.9 next to it — the versions do not interfere, Drift picks 12.x itself. AMD and Intel GPUs are not supported; on a Mac computation always runs on the CPU.
Windows
- Driver — from nvidia.com/drivers or via the NVIDIA App.
- CUDA Toolkit 12.9 — on the CUDA Toolkit archive page choose CUDA Toolkit 12.9.1 → Windows → x86_64 → exe. The «Express» installation is fine. If your driver is newer than the one in the installer, choose «Custom», untick the driver and keep «CUDA».
- The installer sets the
CUDA_PATHvariable itself. Restart Drift.
Debian / Ubuntu
- Driver: on Debian —
sudo apt install nvidia-driver(non-free section), on Ubuntu —sudo ubuntu-drivers install. Check:nvidia-smishows the GPU. - CUDA Toolkit:
- the simplest is the distribution package:
sudo apt install nvidia-cuda-toolkit. It fits Ubuntu 24.04 (CUDA 12.0) and Debian 13 (CUDA 12.4); on Debian 12 it is too old (11.8); - or CUDA 12.9 from the NVIDIA repository, for any of these systems: on the
CUDA Toolkit archive page choose 12.9.1 → Linux →
x86_64 → your distribution → deb (network), run the shown commands that add the repository, then
sudo apt install cuda-toolkit-12-9(CUDA only, without the driver).
- the simplest is the distribution package:
- Drift looks for CUDA in the
CUDA_PATHandCUDA_HOMEvariables, in/usr/local/cuda-12.*,/usr/local/cuda,/opt/cudaand in the system library folders. If CUDA is elsewhere, setCUDA_PATH.
Check
driftfinder.bat --list-gpus      # Windows
./driftfinder --list-gpus        # Linux
The command shows the GPU and the CUDA Toolkit found, or explains what is missing. The same message is shown in the interface under «Where to run stacking» (advanced search settings): choose «on the GPU» there. On the first run the CUDA kernels are compiled for a few seconds, then they are taken from a cache.
| Message | What to do |
|---|---|
| CUDA Toolkit 12.x not found | Install CUDA Toolkit 12.x (above). Installed in a non-standard folder — set CUDA_PATH. |
| Found CUDA Toolkit 13.x, but 12.x is needed | Install CUDA Toolkit 12.9 next to 13.x. |
| NVIDIA driver not found | Install the driver; check that nvidia-smi works. |
| The NVIDIA driver is too old | Update the driver. |
| The GPU is too old | CUDA 12 does not support this GPU — compute on the CPU. |
| Failed to compile a CUDA kernel | CUDA Toolkit is installed partially: the headers are needed too. Install the full CUDA Toolkit (on Linux — cuda-toolkit-12-9 or nvidia-cuda-toolkit, not only the libraries). |
Detailed diagnostics — driftfinder.bat --gpu-diag (Linux: ./driftfinder --gpu-diag). It shows all the
CUDA versions found, library loading and a test computation; attach its output when writing to the author.
What else you need
ASTAP (recommended for plate solving): install it from hnsky.org/astap.htm together with a star database. D50 or D20 suits 0.6–6° fields, W08 suits wide fields.
- Windows: the program finds ASTAP in
C:\Program Files\astap. - macOS: in
/Applications/ASTAP.app. - Linux: in
PATHand/opt/astap.
If ASTAP is installed elsewhere, give its path in the settings («Path to ASTAP»). The ASTAP star database (D80, D50, D20, D05 or V50) is used by the program itself too: if ASTAP has not solved the field, the built-in solver matches the image stars with this database — no internet, in seconds. Without the database the field is solved with the Gaia DR3 catalog (internet required).
- Windows: the program finds ASTAP in
- Internet is needed to identify known objects (JPL), for the VSX variable star catalog, and for plate solving and astrometry refinement only if the ASTAP star database is not installed (then Gaia DR3 via VizieR is used; a large field is queried in parts). Without internet the search works, but without identification. The ATLAS and ZTF survey checks of the «Confirmation» step also use the internet.
The interface opens at http://127.0.0.1:8765 and is available only on your computer.
How to build the program from source yourself — see packaging/BUILD.md.
Working in the interface step by step
The work goes in three steps shown on the left. Processing progress is shown in the log at the bottom of the page.
Step 1. Data
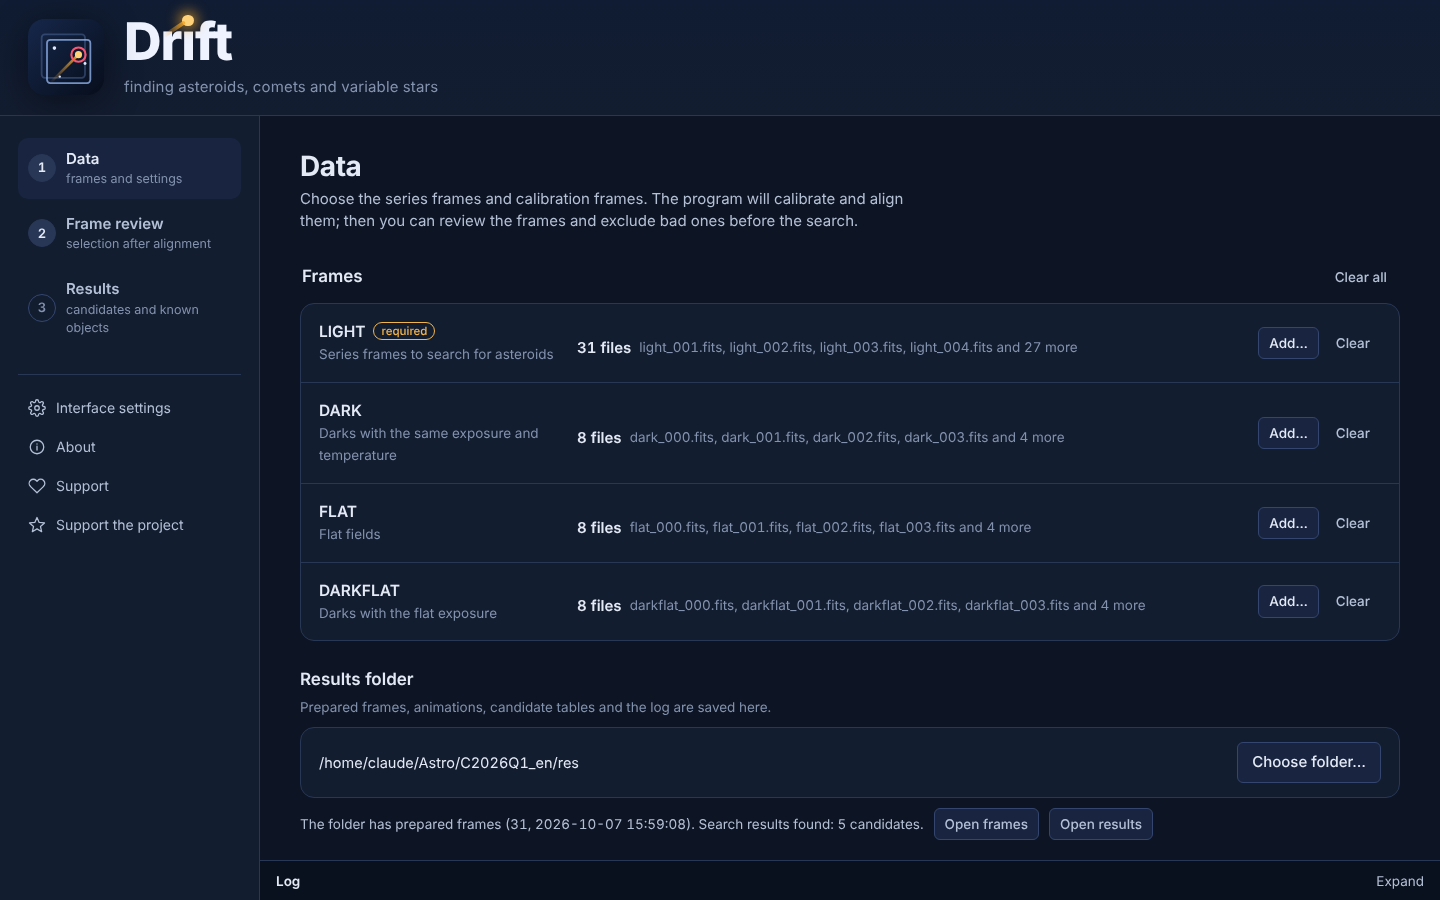
- Add frames. Only LIGHTs are required. DARK, FLAT and DARKFLAT noticeably improve the result at the
field edges and around dust.
- The file dialog opens one level above the folder you added frames from last time, so switching to a new object usually takes one click to reach the new folder.
- You can check individual files or take «All FITS in folder».
- Choose the results folder. You can create a new folder right in the dialog. If the chosen folder already has search results (e.g. from the PixInsight script or the command line), the «Results» step opens right away.
- Set «Known asteroids brighter than V». Set it 0.5–1m fainter than your series actually reaches. Otherwise faint known asteroids will not be identified and will end up in the «new» list.
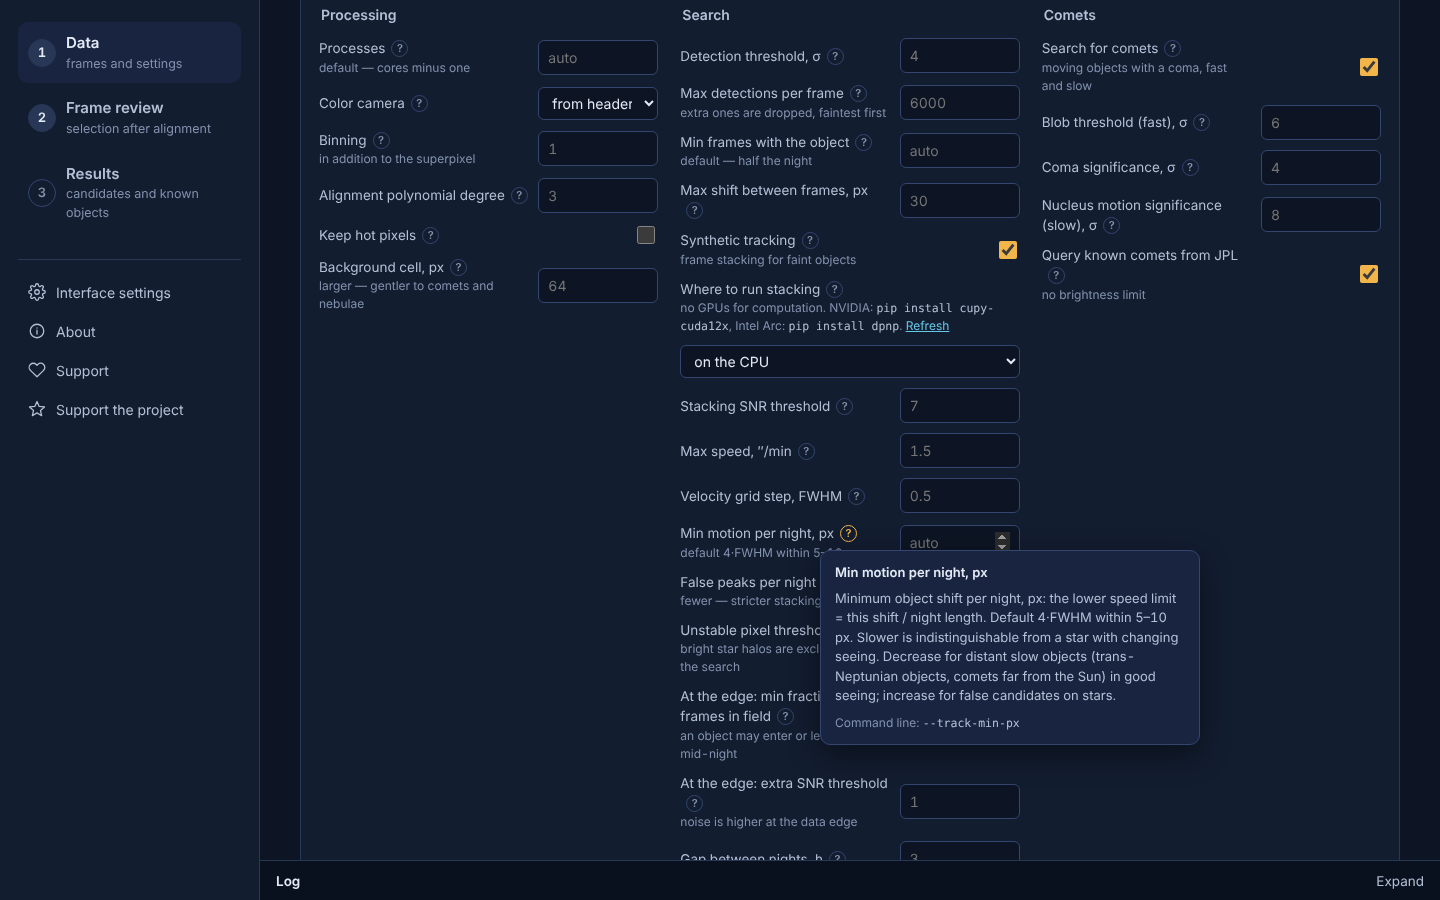
- If needed, open the advanced settings. Every setting has a «?» button: it explains what the setting does and when to change it.
- Click «Prepare frames». Calibration and alignment take from one to several minutes.
Step 2. Frame review
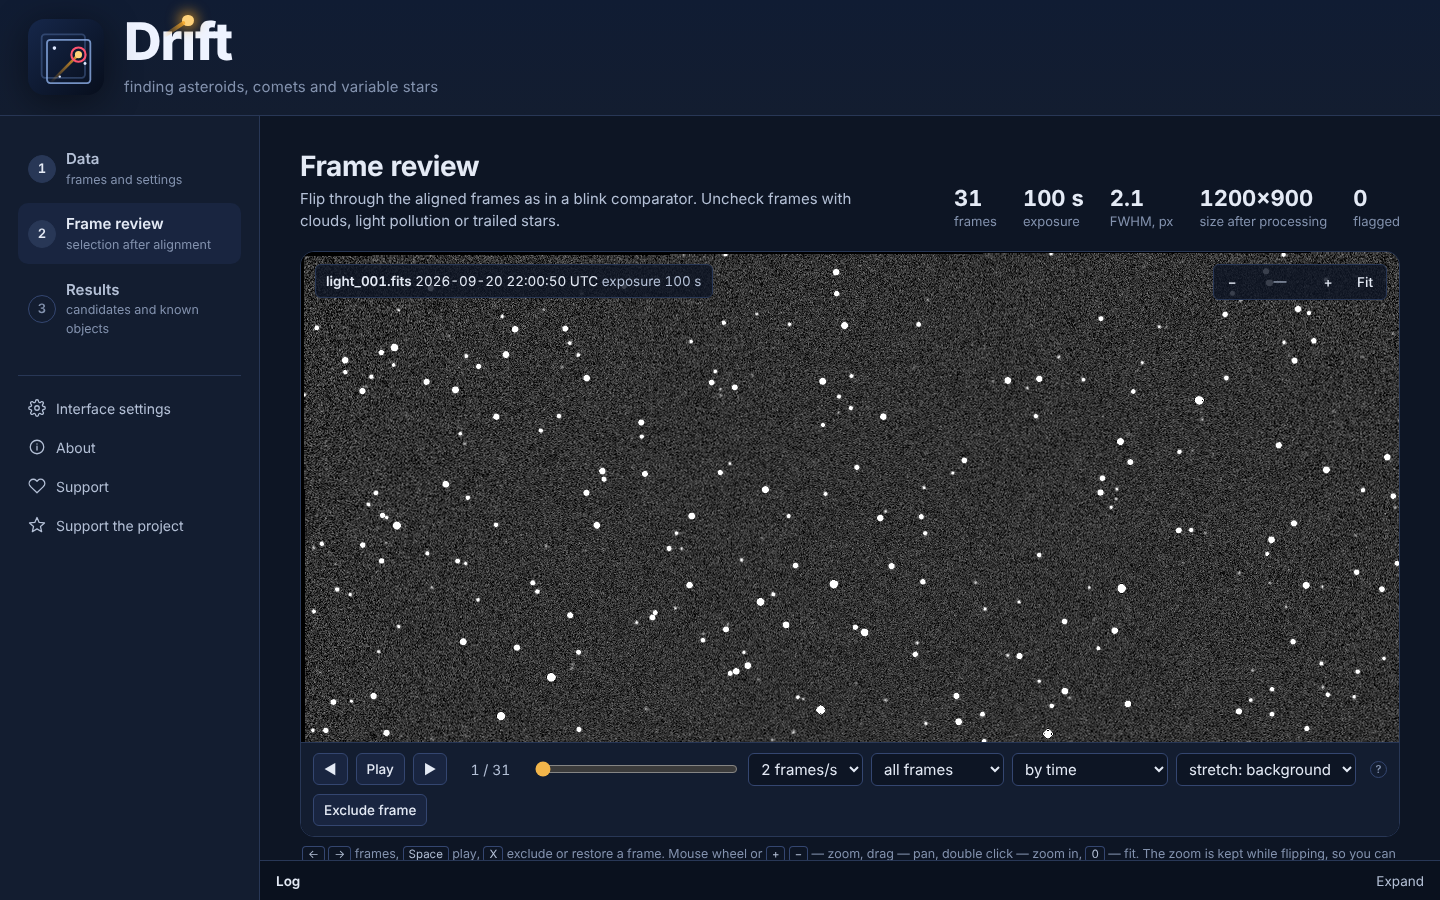
- At the top — a summary: number of frames, exposure, star FWHM, size after processing, number of flagged frames.
- Frames can be flipped through like in a blink comparator: with buttons, the slider or the ← → keys. The playback speed is adjustable.
- The mouse wheel zooms the image, and you can drag it with the mouse.
- Stretch. «Background» shows the faintest objects, «soft» shows the structure of nebulae, comae and bright stars. The stretch does not affect the search.
- Below — cards of all frames: time, exposure, number of stars, noise, alignment accuracy. Uncheck frames with clouds, light pollution or trailed stars — they cause false detections and spoil the thresholds.
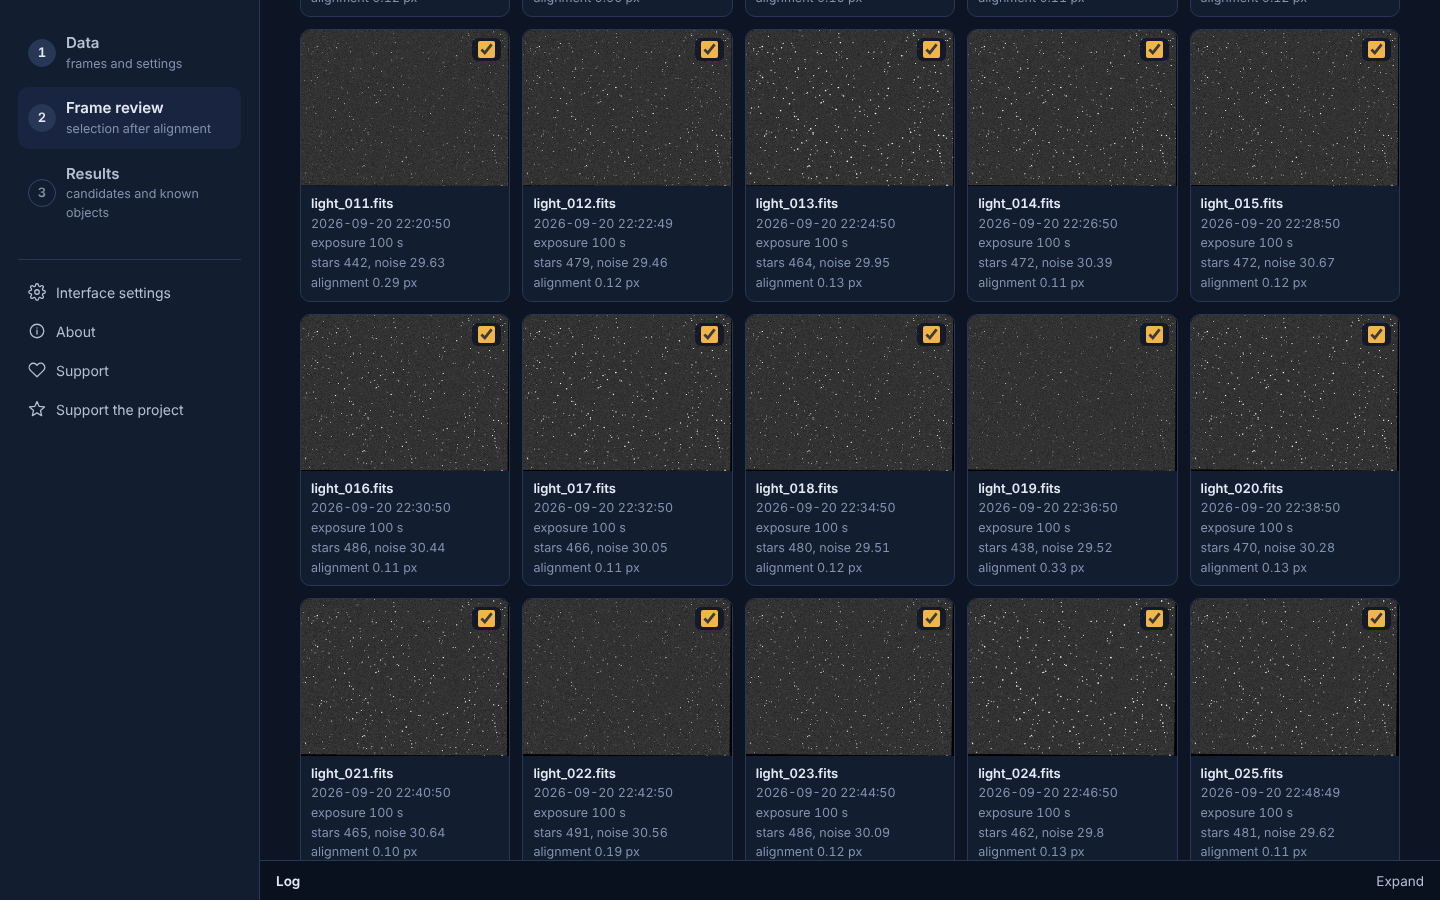
Click «Search for asteroids». The results can be written to a different folder, so previous search variants with other settings are not overwritten.
Step 3. Results
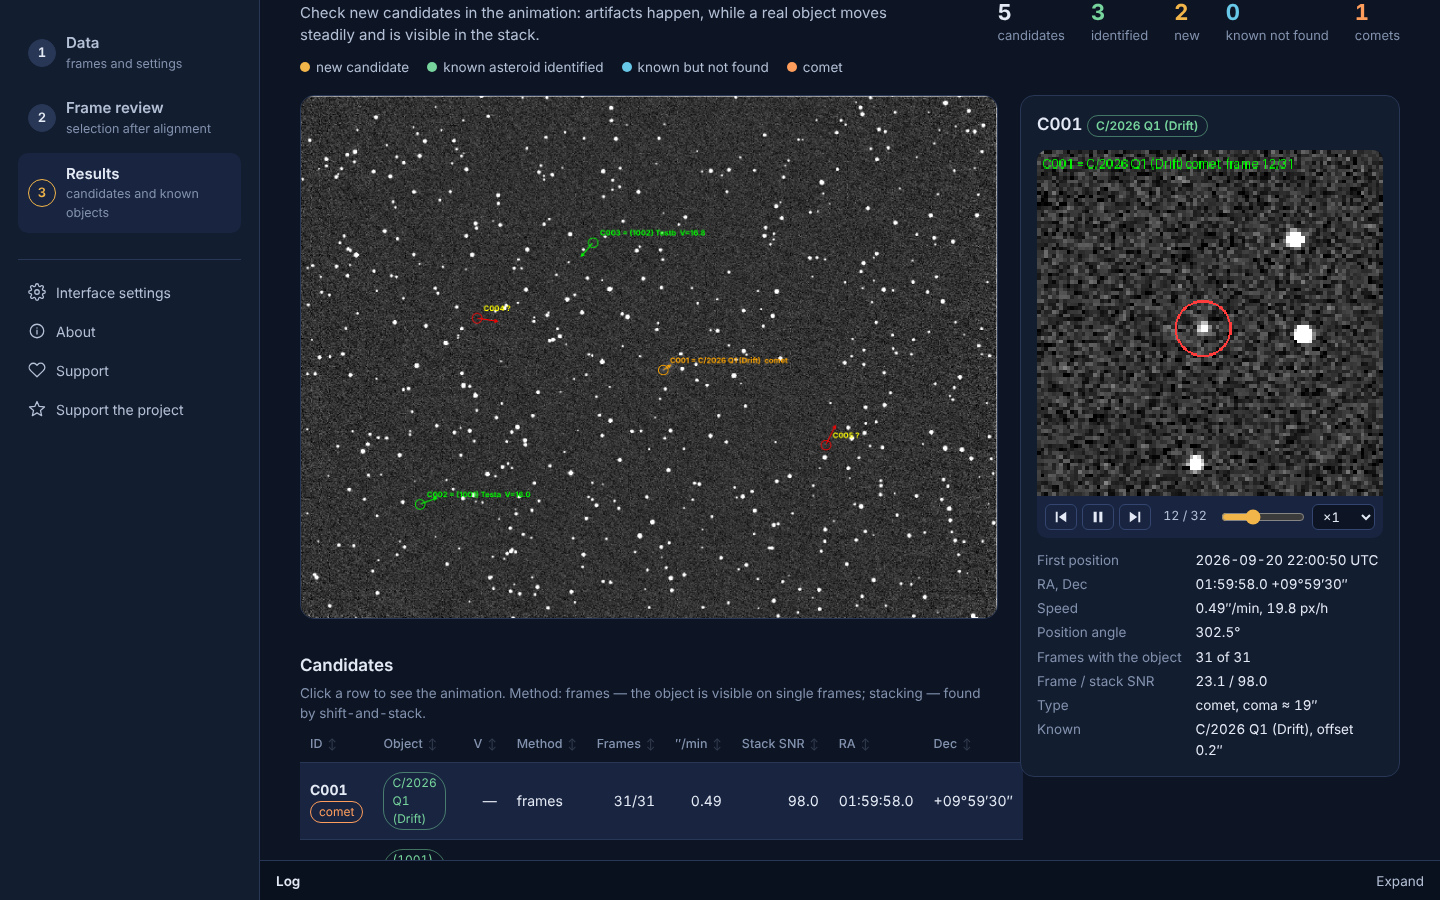
- Summary: how many candidates, how many identified, how many new, how many known objects were not found, how many comets.
- Field overview: found objects are labeled and their direction of motion is shown. A click opens the overview in full size.
- Candidate card on the right:
- animation with a player (pause, frame by frame, speed);
- position, RA/Dec, speed in ″/min and px/h, position angle;
- number of frames with the object, frame and stack SNR;
- type (comet and coma size);
- identification and offset from the JPL prediction.
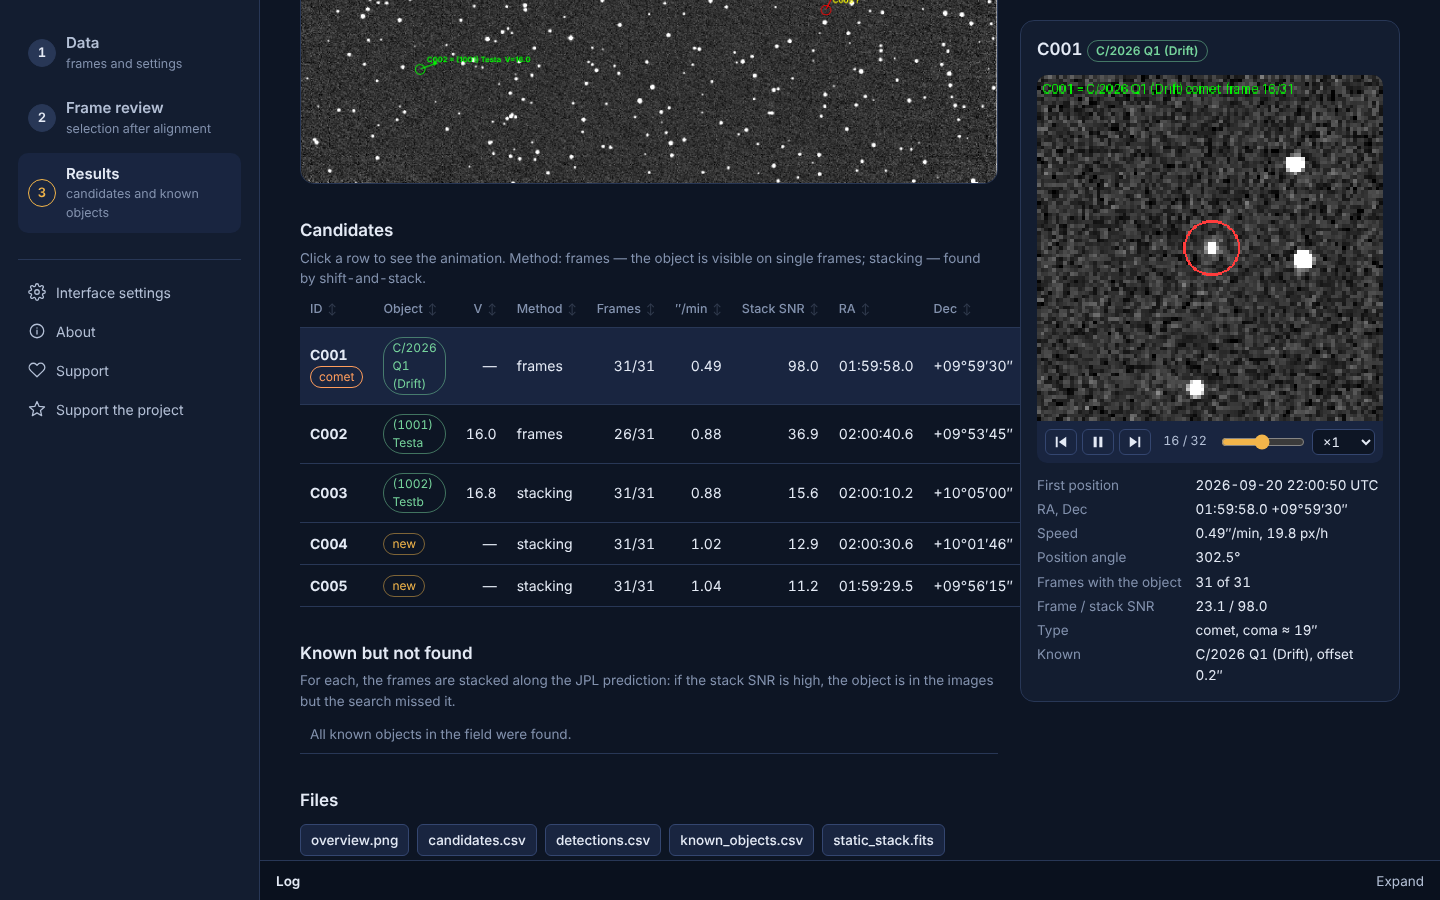
- Candidate table. Sorted by any column with a click on its header. The sort order is remembered.
- Badges: «new», the name of a known object, «comet».
- Detection method: frames — the object is visible on single frames; stacking — found by shift-and-stack; comet search; by JPL prediction — a known comet the search did not pick up but which is clearly visible in the stack along the prediction.
- «Known but not found». For each such object the frames are stacked along the JPL prediction. If the SNR is high, the object is in the images but the search missed it. That is a reason to relax the thresholds.
- Files: all results can be downloaded right from the page.
If a candidate is marked «new» but you expect a known object, first raise the «Known asteroids brighter than V» limit and run the search again. Other causes are listed in «A candidate is not identified».
How to check a new candidate. A real object moves steadily in the animation, at a constant speed, and on the last frame (the stack along the motion) it looks like a sharp star:
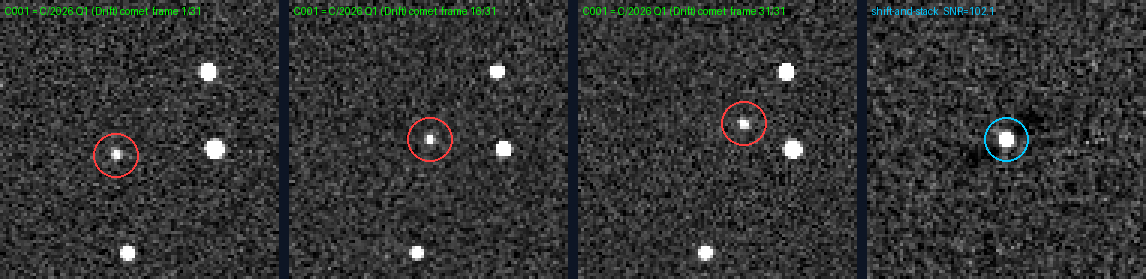
Signs of an artifact:
- the «object» jumps between stars;
- it is visible on only 1–2 frames;
- it stays fixed relative to the sensor while the field drifts;
- it is blurred or invisible in the stack.
The whole overview.png overview image:
Step 4. Confirmation
A new object has to be confirmed. Every candidate has a «Confirmation» button in the table and in its card; it opens step 4 (it can also be chosen on the left). The object is chosen at the top; below are the ways to confirm it, each in its own collapsible block (closed at first): coordinates to search yourself, a check with MPC Checker, ZTF survey images, ATLAS survey photometry and images and a report for the MPC.
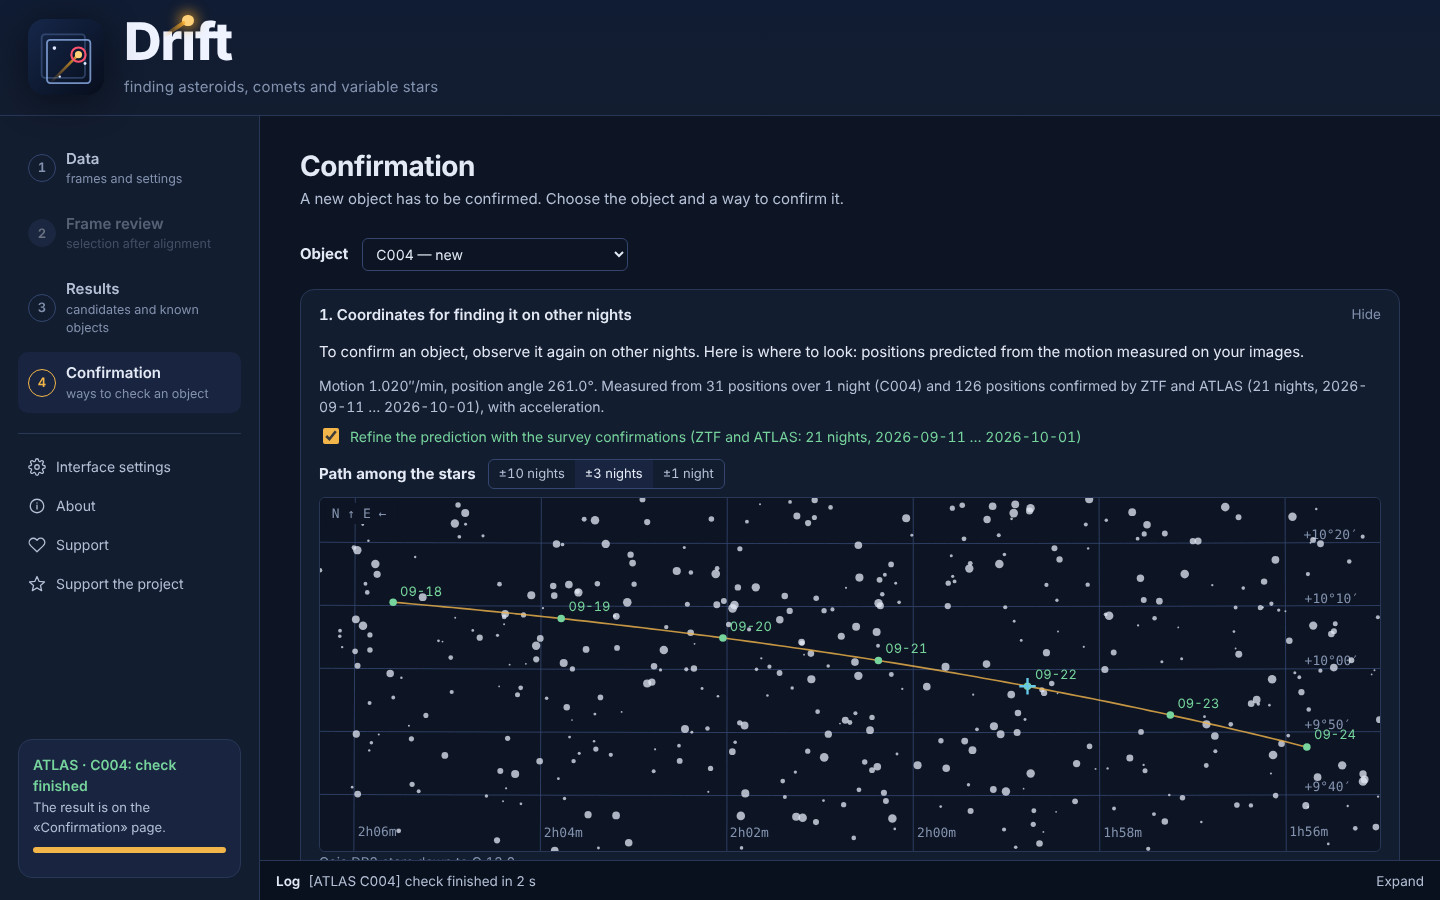
1. Coordinates for finding it on other nights — where to look to observe the object again yourself:
- path among the stars — a chart: the positions at midnight UTC with prediction error circles, stars (from the installed ASTAP database — no internet; without it from Gaia DR3) and an RA/Dec grid; the scale is ±10, ±3 or ±1 night from your observed nights. The nights where the object position is known are green, your own date (below) is a cyan cross;
- motion measured on your images: speed, position angle, from how many positions and nights. If the
object is linked between nights (
O1,O2…), all its nights are used — the prediction is more accurate; - table for midnight UTC — 10 nights before and after the observed nights: RA and Dec (J2000) and an error estimate. The observed nights are highlighted;
- your date and time (UTC) — the position at any moment.
The prediction assumes straight motion at a constant speed measured only over the nights of your observations. The real path curves, so the further the date, the larger the error; for distant dates search a wider area than shown. If the object was observed on one night only, the error grows especially fast.
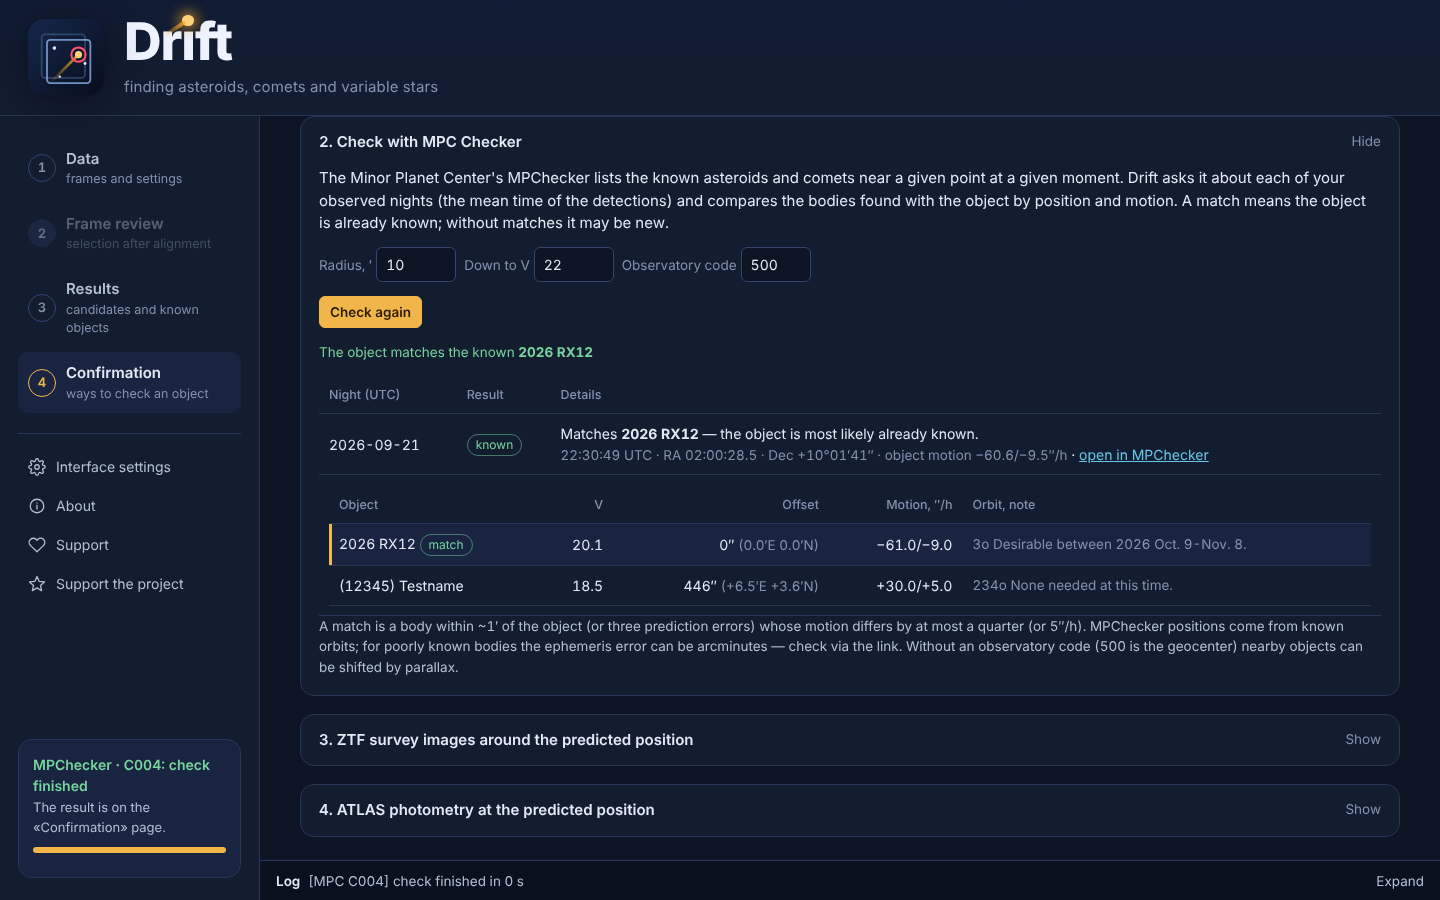
2. Check with MPC Checker. The Minor Planet Center's MPChecker lists the known asteroids and comets near a given point at a given moment. Drift asks it about each of your observed nights (the mean time of the detections, the position from the motion) and compares the bodies found with the object: a match is a body within ~1′ (or three prediction errors) whose motion differs by at most a quarter (or 5″/h). A match means the object is most likely already known; no match — it may be new. No registration is needed.
- The search radius (10′ by default), the magnitude limit (V = 22) and the MPC observatory code are set in the section; the code is taken from the search parameters, otherwise 500 — the geocenter (nearby objects can then be shifted by parallax).
- Each night gets a table of the bodies found (V, offset, motion, MPC orbit and note) and a link to open the same query in MPChecker. For poorly known bodies the ephemeris can be off by arcminutes — check doubtful cases via the link.
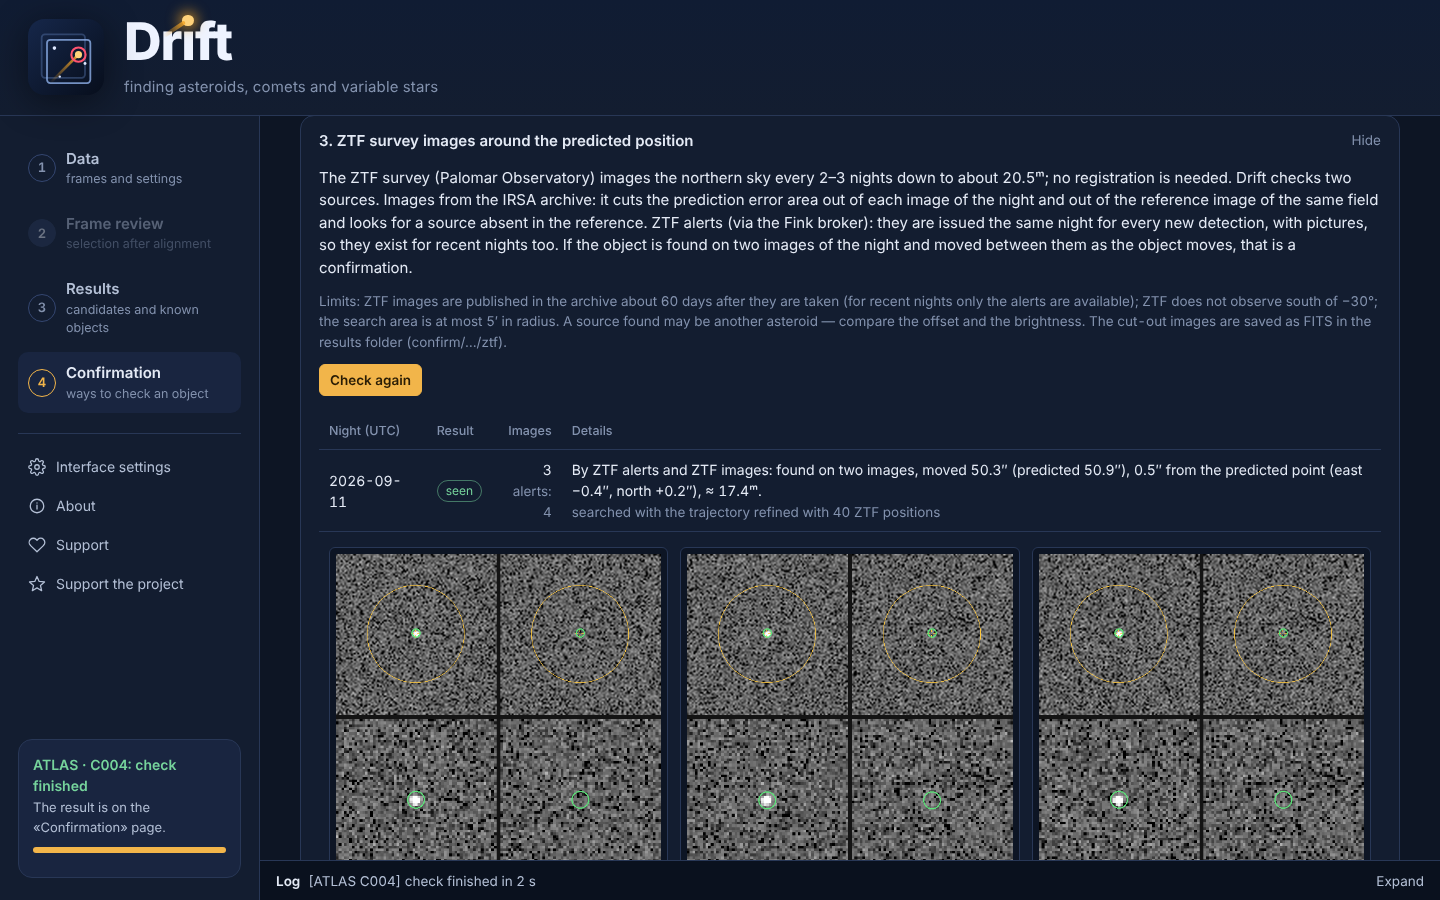
3. ZTF survey images around the predicted position. The ZTF survey images the northern sky every 2–3 nights down to about 20.5ᵐ; no registration is needed. Drift checks each night with two sources:
- Images from the IRSA archive. Drift cuts the prediction error area out of each image of the night (and the same area out of the reference image of the same field) and looks for a source absent in the reference. The images are published about 60 days after they are taken.
- ZTF alerts via the Fink broker. They are issued the same night for every detection on the difference image above ~5σ, with 1′ pictures (image, reference, difference), — so they exist for recent nights too, when the archive has no images yet. If ZTF itself matched the detection to a known asteroid, this is shown.
Order of the check. First the observed nights are checked — there the prediction is accurate. If the object is found, its positions are added to your measurements, the trajectory is recomputed, and the neighboring nights are checked; if it is found there too — refinement again and the next neighbors, and so on. So the search moves step by step to more distant nights until the search area grows above 5′. The log shows how many ZTF positions refined the trajectory and what the error for the next nights is now.
The result for a night:
- Seen — the object is found on two images of the night (images or alerts) and moved between them as the object moves. The offset of the find from the prediction is shown.
- Possibly — there is a new source, but the motion could not be checked (it is found on one image only). It may also be another asteroid — compare the offset and the brightness.
- Only nights where the search area is at most 5′ in radius are checked; ZTF does not observe south of −30°.
- Each image gets a picture (left — the ZTF image, right — the reference, north up), and the cut-outs are
saved as FITS in the results folder
confirm/<candidate>/ztf.
4. ATLAS survey: photometry at a point and a search on the images. The ATLAS survey images almost the whole sky every clear night. Its server can do two things, and Drift uses both. First the program finds out when ATLAS imaged this place on each night and computes the object position at the moment of each image. Then:
- a search on the images — on every night: Drift asks the server for cutouts of the night's difference images (static stars are subtracted there) and looks for the object in the prediction error area itself, as on the ZTF images. The object is found if a source is on two or more images and moved between them the way the object should have moved. If the object moves noticeably during the night, each cutout is centred on its position at the time of that image. The search area is limited by the cutout size (half of it, minus the edges), which is taken from the first cutout received. The object positions are measured on the images;
- prediction better than 6″ — also photometry at a point: the server measures the brightness at the predicted point on each image (on the difference with a reference image, so stars do not interfere). The night result is the better of the two: photometry is more sensitive to a faint object, while the images give a measured position.
- A free key is required: register on the ATLAS site, then enter the user name and password and press «Get the key» (or paste the key — API token — from your account page). The password is not saved; the key is kept in this browser only.
- The order is the same as for ZTF: the observed nights → the neighboring ones → their neighbors…; the positions found refine the trajectory for the next step. If ZTF (way 3) has already confirmed the object, its nights count as known too, and ATLAS searches with the trajectory refined by ZTF.
- ATLAS sees objects down to about 19.5ᵐ. The result for a night (the better of the two ways): seen (photometry: S/N ≥ 5 on two or more images; images: a source on two or more images that moved like the object), possibly (photometry — on one image; images — there are sources, but none moves like the object), not seen (with the image limit), no images. Nights checked on the images have pictures in the table: the difference image with the search area, the reference image of the same place next to it and a zoom around the source found, plus links to the FITS files.
- The server queue can be long — from minutes to hours; image requests usually take longer than photometry, and the server accepts at most 5 image requests at a time. Keep the program open; if it is closed, the check can be continued with «Resume the check». At most 25 nights per check are searched on the images (that is, all of the ±10 nights).
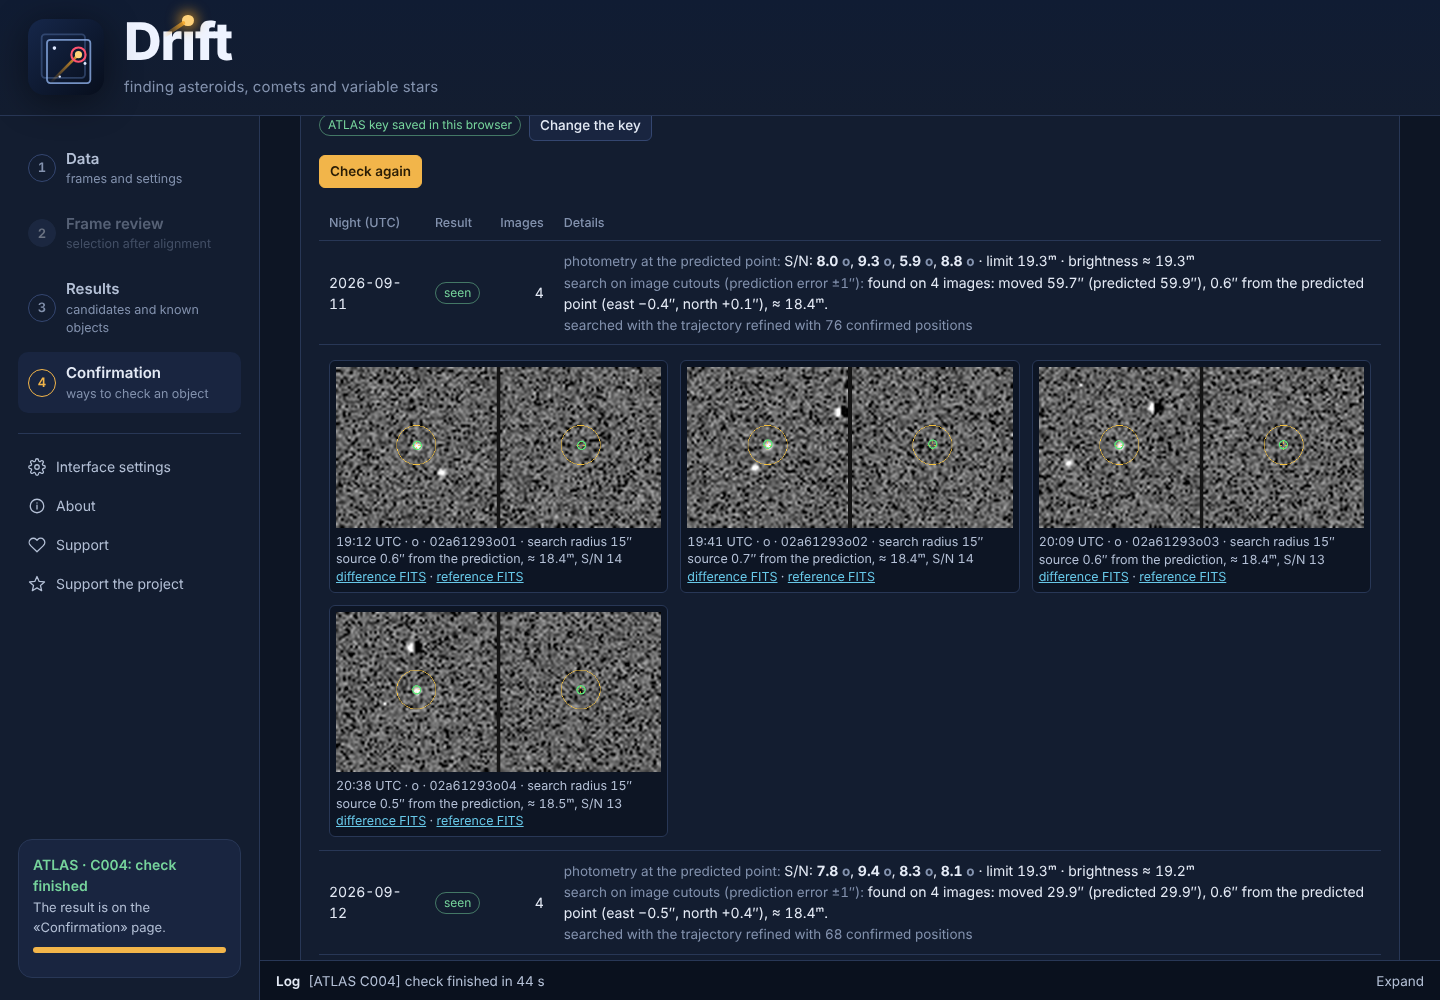
Refining the prediction. The positions confirmed by the surveys (ZTF and ATLAS) are added to your measurements, and the prediction of way 1 is recomputed over the whole arc. This is controlled by the «Refine the prediction with the survey confirmations» checkbox under the «Motion…» line of way 1: it is always shown and on by default, and takes effect when ATLAS or ZTF has found the object; the confirmed nights are marked in the table. The confirmations of one survey are also used by the check with the other. When the arc is at least 2 days and 3 nights long, acceleration is added to the motion: an asteroid path is curved, and a straight line over such an arc would be off by tens of arcseconds. The error for dates outside the arc is an estimate: the change of the acceleration is not measured.
Tip: ZTF first, then ATLAS. ZTF looks for a new source in an error area of up to 5′ and refines the trajectory with the positions it finds, so it gets far from your nights. ATLAS searches the images only within its small cutout, and uses photometry only when the prediction is better than 6″: with the trajectory refined by ZTF it checks more nights faster and gives an independent confirmation by another telescope.
5. Observation report for the MPC. Prepares a file to send to the Minor Planet Center: your positions of the object (3–5 per night, spread over the night), names, telescope, reference catalog, magnitudes per night (if given). The program decides which report it is:
- the object is known (by MPChecker or JPL) — observations of a known object, with its designation;
new, confirmed by the surveys — the survey observations can be attached to your positions, as separate blocks with their own observatory codes (3–5 per night):
- ZTF (I41) — from the ZTF alerts (position, magnitude and g/r/i filter are ZTF pipeline measurements) and the positions measured by Drift on archival images;
- ATLAS (the station code from the exposure: T05, T08, M22, W68, R17) — the ATLAS magnitude in the o/c filter. For nights where the object is found on the images — positions measured by Drift on the ATLAS difference images (catalog ATLAS-RefCat2, remark «measured by the submitter on ATLAS image …»); for nights where it is found by photometry only — the Drift prediction at which ATLAS measured the flux, confirmed by the detection to about 2″ (rms 2″);
each row says in
remarkswhere it comes from. ZTF and ATLAS send their detections to the MPC themselves, so the MPC may treat these rows as duplicates;- new, no confirmations — a report for the NEOCP (the NEO Confirmation Page): when submitting choose «Unusual object?» → New NEO Candidate. The MPC posts only NEO-like objects on the NEOCP (a digest2 score above 65, computed by the MPC itself); the program shows the object's speed as a hint.
The formats are ADES PSV (the main MPC format) and MPC1992 (80 columns, obsolete). A format that is
not allowed is blocked with an explanation: without your own observatory code (XXX) the MPC accepts
ADES only, and Drift does not write blocks with the survey codes in an 80-column report. For XXX the
observing site is needed (longitude, latitude, altitude). Note: code XXX is meant only for obtaining your
own code — such a batch may contain numbered NEAs only, so the MPC will not accept a report of a new object
with XXX; the program warns about it. The file is saved in confirm/<candidate>/ and can be checked
without submitting on the submit_psv_test page; ADES is
submitted through the MPC form.
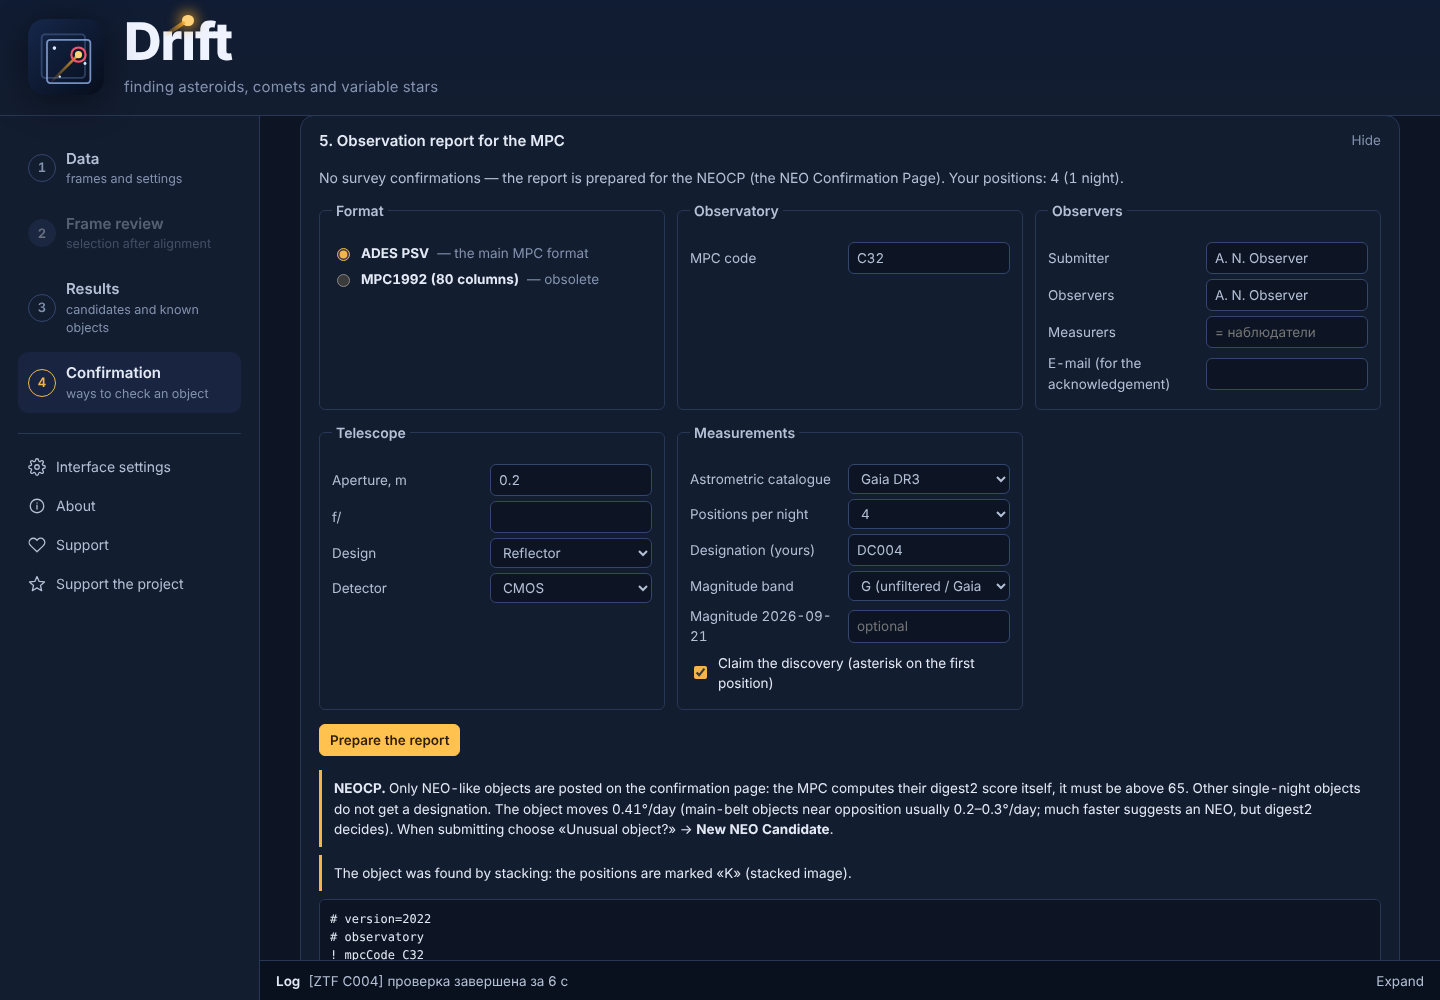
The progress of the ATLAS and ZTF checks is shown by a progress bar in the section and in the box on the
left (when no search is running), and every step — requests, images found, measurements, the result by
night — is written to the log at the bottom and to the files confirm/<candidate>/log_atlas.txt,
log_ztf.txt. The check results are saved there too (atlas.json, ztf.json) and are shown again the
next time.
Settings, About, Support, Support the project
Below the steps in the left column there are four service sections.
- Language — the EN / RU switch in the top right corner (English by default). It changes the interface, the «?» hints, the log messages and the text of the About section; the choice is remembered.
Interface settings.
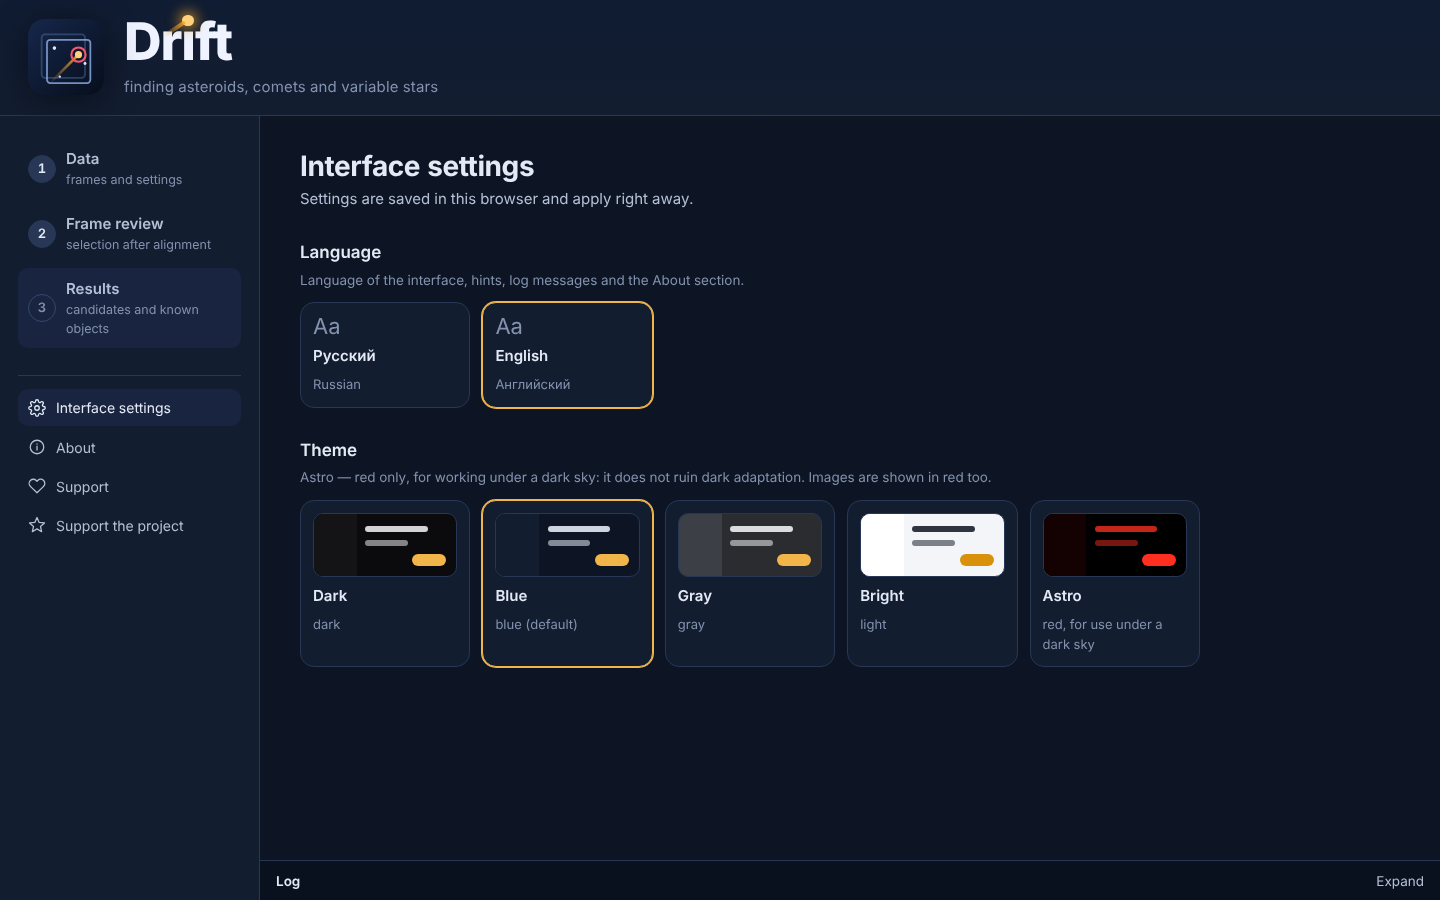
- Theme: Dark, Blue (default), Gray, Bright and Astro — red only on black, for working under a dark sky: it does not ruin your dark adaptation. In the Astro theme images, animations and charts are shown in red too.
The settings are saved in the browser and apply right away.
- About — this document right inside the interface, in the chosen language.
- Support — the address for questions and bug reports.
- Support the project — a link to Boosty.
How the search works
- Calibration and alignment.
- The background is subtracted from each frame (in
--bg-boxcells). - The frames are registered on stars. Photometric factors equalize the transparency.
- The background is subtracted from each frame (in
- Static sky.
- The median of all frames is the stars and nebulae. Subtracting it leaves what moves.
- A star mask and a mask of «unstable» pixels (halos of bright stars with changing seeing) are built separately.
- Single-frame search. Sources above the
--nsigmathreshold are extracted on the difference frames. They are then linked into straight tracks with a constant speed. Each track is confirmed by stacking the frames along it. - Synthetic tracking.
- For each night a grid of velocities is tried, and all frames are stacked with a shift.
- The lower speed limit is a shift of at least 5–10 pixels over the night. A slower object cannot be told from a star with changing seeing.
- The SNR threshold is calibrated on the noise: the frames are shuffled in time and the number of false peaks produced by pure noise is counted.
- Candidates are checked for being static, for an even signal in both halves of the night and for a signal gathered in only a few frames.
- The noise is normalized across the field: corners after the flat and light-pollution bands are noisier than the center and would otherwise give extra false peaks.
4a. Field edges. The field is searched right up to the edge. Frames in which the object is beyond the
edge (mount drift, the object entering or leaving the field mid-night) are not counted, neither in the
sum nor in the «minimum frames» requirement. Frames where the candidate crosses a star are not counted
during verification either. For faint candidates at the very edge the SNR threshold is higher
(--edge-snr), and the object must be in the field in at least half of the night's frames
(--edge-cover).
- Comets — see below.
- Several nights. Tracks of different nights with consistent motion are merged into an object (
O1,O2, …). - Astrometry. Plate solving: ASTAP; then the built-in solver with the ASTAP database (triangles of bright image and database stars — any scale, rotation and mirroring); then with Gaia DR3; then astrometry.net. Then a polynomial correction (distortion) with the ASTAP database or Gaia DR3.
- Identification.
- Positions of known asteroids and comets at the start and end of each night are queried from JPL.
- A candidate is identified if its position matches or, with inaccurate astrometry, its motion matches.
- For known objects that were not found, the frames are stacked along the prediction.
Comets
The regular search is designed for point-like objects. The coma of a comet that moves less than its own size during the night ends up in the «static sky» and is subtracted together with the stars. That is why comets are searched for in three additional ways:
- Fast comets. The night is split into three parts. Diffuse blobs lying on a straight line are looked for in the differences of the parts. A comet must have a nucleus visible when stacked along the path and a symmetric coma that moves together with the nucleus.
- Slow comets (like 29P/Schwassmann–Wachmann). Among extended sources with a central condensation, those whose nucleus shifts significantly during the night are selected. The «nucleus» of galaxies and nebulae stays put.
- Coma around found objects. If the regular search found the nucleus, the program checks whether it has a coma.
Known comets are queried from JPL in a separate request, without a brightness limit. If a known comet is clearly visible when stacked along the prediction but the search did not pick it up, it still becomes a candidate — with the «by JPL prediction» method.
Command line
Everything is available without the interface too. The command line is started with driftfinder.bat on
Windows and ./driftfinder on Linux and macOS (after install.sh on Linux — just driftfinder). The
examples below are for Windows; on Linux and macOS everything is the same, only with ./driftfinder and
paths like ~/Astro/....
Help on every option — what it does and when to change it:
driftfinder.bat --helpThe same text is collected in PARAMETERS.en.md. Messages, the log and the help are
in English by default; in Russian with --lang ru (or the DRIFT_LANG=ru environment variable).
A full search in one run:
driftfinder.bat --lights D:\Astro\M31\light --darks D:\Astro\darks\600s ^
    --flats D:\Astro\M31\flat --darkflats D:\Astro\M31\darkflat ^
    -o D:\Astro\M31\res --vmag-lim 19 --gpu auto
Frames can be given as a folder, a mask (light\*.fits) or a list of files.
In two stages, like the interface: prepare once, then search with different settings.
driftfinder.bat --lights ... --darks ... -o D:\Astro\M31\res --prepare-only
driftfinder.bat --resume D:\Astro\M31\res\_session -o D:\Astro\M31\res_v2 --track-fa 0.5
driftfinder.bat --resume D:\Astro\M31\res\_session -o D:\Astro\M31\res_v3 --use-frames @good.json
Useful:
| Task | Options |
|---|---|
| Compute on the GPU (needs CUDA 12, see Computing on an NVIDIA GPU) | --gpu auto (or --gpu cuda:0, list — --list-gpus) |
| No internet | --known none --no-refine-wcs |
| The field does not solve | --ra 10:05:20 --dec +09:03 --pixscale 4.4 (hint the center and scale) |
| Fast near-Earth objects | --track-vmax-arcmin 5 --max-step 60 |
| Only a quick check of bright objects | --no-track |
| Animations of known objects not found | --known-gif |
| Messages and help in Russian | --lang ru (or the environment variable DRIFT_LANG=ru) |
Running from PixInsight
The archive contains the script pixinsight/DriftFinder.js: it runs Drift from PixInsight without the
web interface — for example, right after calibration in WBPP.
Installation (once): in PixInsight — Script → Feature Scripts… → Add, choose the pixinsight folder
of the Drift archive, then Done. The script appears in Script → Utilities → DriftFinder. You can also
run it without installing: Script → Execute Script File… → DriftFinder.js.
Usage:
- In the script window give the Drift folder (where the archive was extracted) and the **results folder**. If the program is found in the folder, a green check mark appears next to it, otherwise a red cross.
- Add LIGHT frames and, if you have them, DARK, FLAT, DARKFLAT. You can use frames already calibrated and solved in WBPP — then calibration frames are not needed.
- Set the main options: the «Known brighter than V» limit, where to run stacking, plate solving, the
number of processes, comets, variables. Any other options go into «Other options» (e.g.
--track-fa 0.5 --known-radius 20). - «Run search». The Drift log goes to the PixInsight console; to stop — the console's Abort button.
- When it finishes, the console lists the candidates (identified, new, comets) and the path to the
results folder, and PixInsight opens the field overview
overview.png(and the variables map, if they were searched). Candidate animations (GIF), tables and the log (log_search.txt) are in the results folder. - Viewing the results. The easiest way is the Drift interface: start it (
Drift.bat) and on the first page («Data») choose the results folder as the «Results folder» — the «Results» section opens right away with the candidate table, the animation player and known but not found objects. The script reminds you of this at the end and prints the folder path.
The window settings are remembered. The language of the window and the log (English / Russian) is chosen at the top of the window.
If something is wrong: what to adjust
| What you see | What to do |
|---|---|
| Many false candidates near bright stars | Lower --unstable to 2.0. Exclude frames with poor seeing. |
| False candidates in a dense star field (Milky Way) | --track-fa 0.3. Raise --track-snr to 8–9. Lower --max-on-star. |
| Static faint stars become candidates | Increase --track-min-px. Lower --track-zero to 0.7. |
| A known asteroid is visible in the stack (SNR > 7) but not found | Check --vmag-lim. Lower --track-snr or raise --track-fa to 2–3. |
| Known objects are found but not identified | Raise --vmag-lim and rerun the search. Check plate solving in the log. Increase --known-radius to 20–30″. Give --observatory. Details — in «A candidate is not identified». |
| ASTAP does not solve the field | Check the star database (D50/D20). Hint --ra --dec --pixscale. The built-in solvers (with the ASTAP database, with Gaia) kick in by themselves. It happens on dense Milky Way fields with long exposures: many saturated stars. |
| A comet is not found | Increase --bg-box for a large coma. Lower --comet-sig and --comet-move-sig. If the comet is known, it will be marked by the JPL prediction. |
| False «comets» on a nebula | Raise --comet-snr and --comet-sig. Or --no-comets. |
| An object at the edge or entering the field mid-night is not found | Lower --edge-cover to 0.3 and --edge-snr to 0.5. |
| False candidates at the frame edges | Raise --edge-snr to 1.5–2. Check the flats: edges without a flat are very noisy. |
| «Gaia catalog unavailable» / VSX unavailable | A network or VizieR server failure: the query is retried automatically (--catalog-retries, 10 times by default); increase it with an unstable connection. |
| The search takes too long | --gpu auto. Increase --track-smear to 0.7. Decrease --track-vmax-arcmin. |
| Not enough memory | Decrease --jobs. |
A candidate is not identified
A candidate is marked «new», but you suspect it is a known asteroid or comet. Go through the steps in order: the first two are the most common causes.
- Raise the brightness limit for known objects and rerun the search. The program queries JPL only
for objects brighter than the given magnitude: the «Known asteroids brighter than V» field in step 1,
--vmag-limon the command line (17 by default). An object fainter than the limit is not in the JPL response, and the found candidate stays «new». This happens especially often with long series and shift-and-stack: it finds objects 1–2 magnitudes fainter than what is visible on one frame.- Set the limit 1–2m fainter than the series reaches, e.g. 19–20.
0— no limit: the query takes longer, and the «Known but not found» list will contain many invisible objects. - In the interface: go back to step 1 (the «Data» button on the left), change the magnitude, go to step 2 and click «Search for asteroids» again. The frames are not prepared again, the search runs on the already prepared session. To keep the previous result, choose another folder for the new one.
- On the command line: rerun the search on the prepared session with the new limit, e.g.
driftfinder.bat --resume D:\Astro\M31\res\_session -o D:\Astro\M31\res_v20 --vmag-lim 20. If the frames were not prepared separately (--prepare-only), repeat the full command with the new--vmag-lim.
- Set the limit 1–2m fainter than the series reaches, e.g. 19–20.
- Check the search log (
log_search.txtor the log at the bottom of the window).- «Known asteroid labeling skipped: the reference frame header has no WCS» — the field is not solved:
install ASTAP or hint the field center (
--ra --dec --pixscale). - «…no observation time (DATE-OBS)» — the FITS headers have no time, identification is impossible.
- «WARNING: failed to get JPL data» — an internet or server failure. Increase
--jpl-retriesand rerun. - The line «Querying known small bodies (JPL) brighter than V=…» shows which limit was actually applied.
- «Known asteroid labeling skipped: the reference frame header has no WCS» — the field is not solved:
install ASTAP or hint the field center (
- Look at the «Known but not found» table. If it has an object near the candidate with similar
motion, the identification is spoiled by an offset from the prediction:
- increase the identification radius to 20–30″ («Identification radius» in the advanced settings,
--known-radius); - give the observing site: an MPC observatory code (
--observatory) or coordinates in the header (SITELAT/SITELONG). Without them the prediction is computed for the center of the Earth, and for near-Earth objects the error reaches arcminutes; - check that the camera or computer clock was accurate during the session: a one-minute time error shifts a fast object by its one-minute motion;
- if the field was solved with an error, keep the Gaia astrometry refinement on: without it the offsets from the prediction are larger at the field edges.
- increase the identification radius to 20–30″ («Identification radius» in the advanced settings,
- A comet. Comets are queried separately, without a brightness limit; check that
--no-jpl-cometsis not set. The predicted nucleus position of bright active comets can be inaccurate — the same increase of the identification radius helps. - Check the candidate with the MPC. If nothing above helped, check the candidate with the Minor Planet Center's MPChecker — easiest on the «Confirmation» step (way 2): the program asks MPChecker about each night and compares the motion. If there is nothing there either, and the animation and the stack along the motion are convincing (see «How to check a new candidate»), the object may really be new: observe it on one or two more nights and send the measurements to the MPC. Where to look for it on other nights and whether it got onto ATLAS and ZTF survey images — see the «Confirmation» step.
Observing tips
- 10 or more frames per night, better 20–40. The longer the series, the fainter the objects stacking can find.
- Night length — from 1–2 hours. During the night the object must move at least 5–10 pixels: a typical main-belt asteroid moves ~30–40″ per hour.
- Several nights in a row let you link the tracks into an object and reject artifacts more reliably.
- Exposure — short enough that the asteroid does not trail more than 1–2 FWHM per frame.
- Darks and flats noticeably reduce false detections at the field edges and around dust.
- Time in the header (
DATE-OBS) and the observing site (SITELAT/SITELONGor--observatory) are needed for accurate identification.
Mono and color cameras
Both work. The program recognizes the camera type by the BAYERPAT keyword (or a similar one) in the FITS
header.
- Color camera (raw frames with a Bayer matrix): after calibration every 2×2 pixels are summed into one (superpixel). The resolution on each axis is halved and the signal per pixel grows. The log shows a «Color camera (BAYERPAT=…)» line.
- Mono camera: there is no such keyword, the frame is processed at full resolution.
- There are 4 times more pixels than with a color camera with the same sensor: processing takes longer and needs more memory (the program chooses the number of processes itself).
- The star FWHM in pixels is about twice as large. The program derives thresholds, tolerances and the minimum motion per night from the FWHM and scale itself, nothing needs adjusting.
- If the FWHM in the log is above ~5 pixels, set «Binning» to 2 (
--bin 2): the search becomes faster and the signal per pixel higher, with no loss for the search. - The sensitivity is higher, especially without a filter or with L — the best option for asteroid hunting. Narrowband filters (Ha, OIII) are not suitable: asteroids shine by reflected sunlight and are almost invisible through them.
- Debayered color FITS (three RGB planes) work too: the planes are averaged into luminance.
If the capture software wrote a color camera keyword into mono frames (or, the other way round, a color
camera has no keyword but the frame shows a grid of colored pixels), set the type manually: «Color camera:
no / yes» in the settings, --cfa no or --cfa yes on the command line.
What not to do:
- Do not mix frames from different cameras in one run: they have different scales and the alignment will fail. Process nights with a color and a mono camera separately.
- Calibration frames (darks, flats) — from the same camera. Flats — with the same filter as the LIGHTs.
- Do not change the filter within a series: stars of different colors change brightness differently, and their residuals after subtraction cause false detections.
Experimental: variable star search
The feature is experimental and off by default. False detections are possible — check candidates by their light curve and animation. It works best on a series of several nights.
How to turn it on: in the interface — the «Search for variable stars» checkbox in the «Variable stars —
experimental» group. On the command line — --variables.
What it does:
- Photometry. Measures the brightness of all stars in the field on all frames (aperture 2·FWHM). The background is fitted with a plane, so it works on nebulae too.
- Weather and seeing correction. Corrects the brightness using an ensemble of comparison stars: a global per-frame correction and a local one from the nearest stars. Accounts for the seeing dependence and excludes bad frames.
- Candidate selection. Looks for stars whose:
- brightness scatter is noticeably larger than for stars of the same brightness (
--var-sigma); - changes are smooth rather than jumping from frame to frame like noise (
--var-eta); - mean brightness changes significantly from night to night (
--var-min-step) — for several nights this is the main sign of a real variable.
- brightness scatter is noticeably larger than for stars of the same brightness (
- Rejecting false ones. Curves similar to the curves of many other stars (clouds, seeing) are rejected. Stars near saturated ones, elongated ones (doubles) and those with «variability» caused by one or two frames are not measured or are excluded.
- VSX cross-check. Cross-checks the candidates with the AAVSO VSX variable star catalog and shows what could be measured for the known variables in the field.
Result. The «Variable stars» and «Known variables in the field (VSX)» sections appear in the interface. Every star has an animation and a light curve, the tables can be sorted.
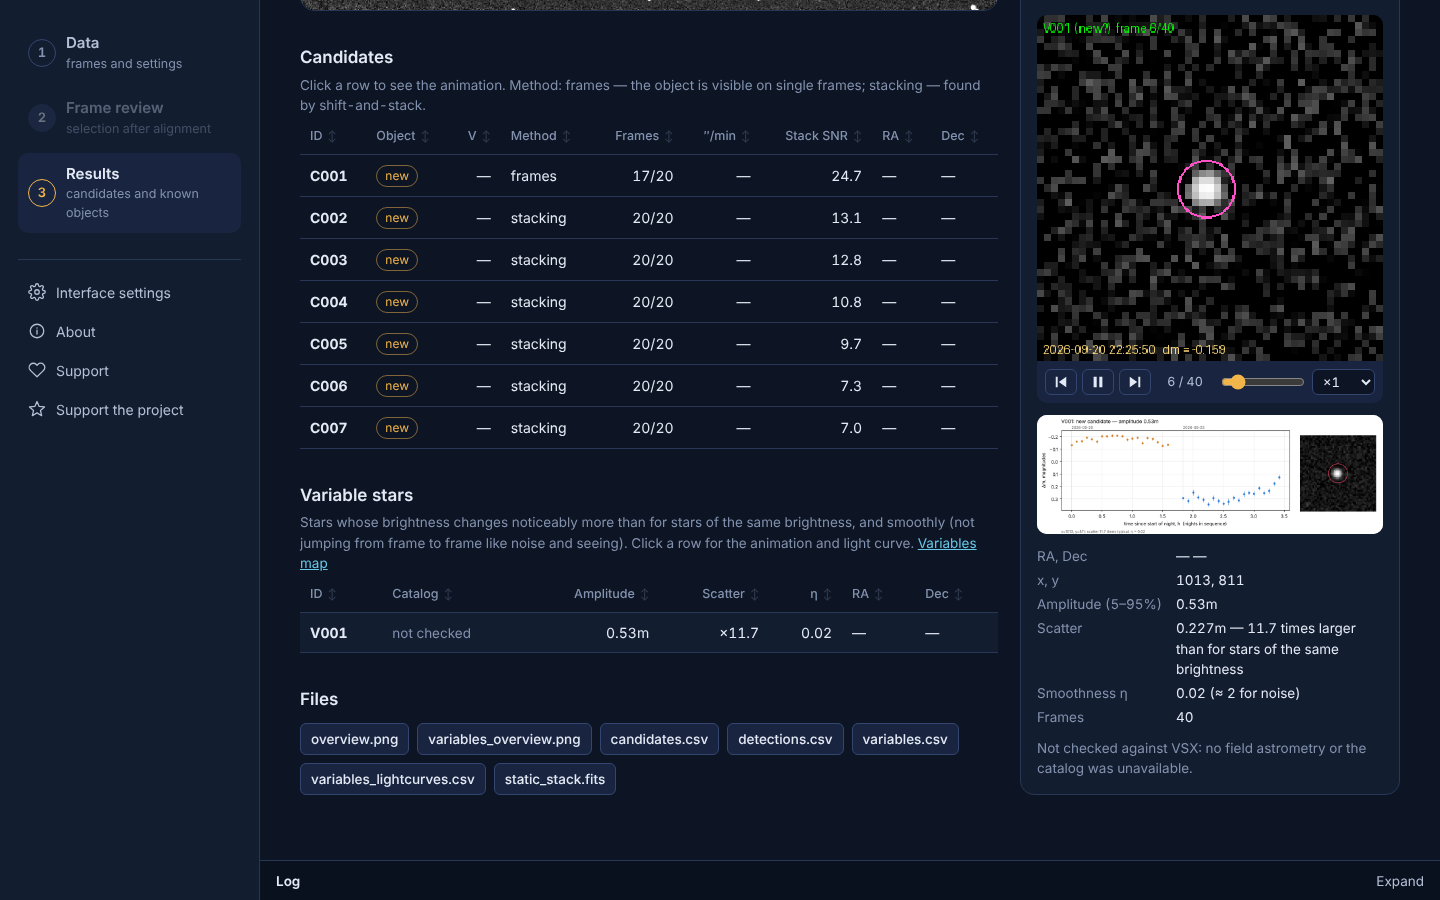
Light curve: each night has its own color. Vertically — the brightness change relative to the mean (up is brighter). On the right — the star in the stack.
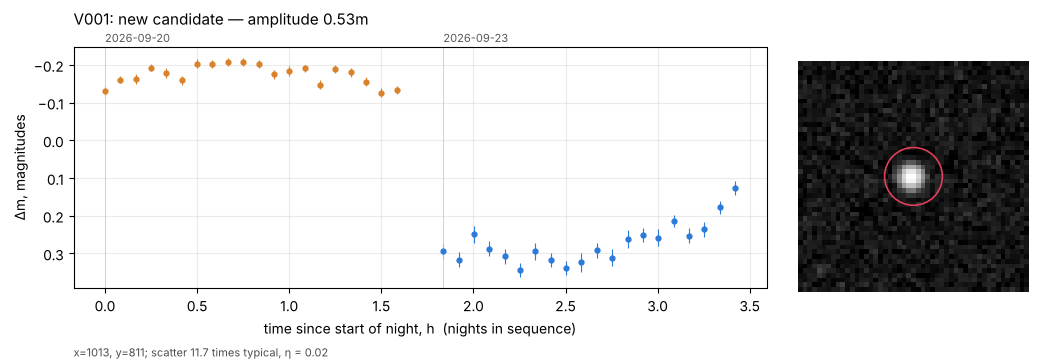
Files:
| File | Contents |
|---|---|
variables.csv | Candidates: coordinates, brightness, amplitude (5–95%), scatter and how many times it exceeds the typical one, smoothness η, VSX identification. |
known_variables.csv | Known variables in the field from VSX: type, brightness range, period and what was measured on your images. |
variables_lightcurves.csv | Light curves of all candidates, frame by frame. |
V001.png, V001.gif, … | Light curve and animation of each candidate. |
vsx_<name>.png | Curves of known variables. Their animations — with --vsx-gif. |
variables_overview.png | A field map with the variables marked. |
What to adjust:
| What you see | What to do |
|---|---|
| Many false variables | Raise --var-sigma to 3 and --var-min-amp to 0.1. |
| You need variables changing within a night (eclipsing) or have a one-night series | --var-any-night. There will be more false ones. |
| Faint variables are missed | Lower --var-min-snr. |
All options with descriptions are in PARAMETERS.en.md, section «variable stars».
What is in the program archive
| File | Purpose |
|---|---|
Drift.bat (Windows), drift.sh (Linux), Drift.command (macOS) | Launch the interface in the browser. |
driftfinder.bat (Windows), driftfinder (Linux, macOS) | Command line: --help — all options. |
pixinsight/DriftFinder.js | A script to run Drift from PixInsight. |
install.sh (Linux) | An application menu icon and the drift / driftfinder commands in ~/.local/bin. |
README-windows.txt, README-linux.txt, README-macOS.txt | In brief: launch, GPU, ASTAP. |
README.en.pdf | This document with screenshots — for reading and printing. |
README.en.md, docs/, driftfinder_logo.en.png | The same document in Markdown; its images. |
README.pdf, README.md | The document in Russian. |
PARAMETERS.en.md, PARAMETERS.md | Description of all options: what they do and when to change them (English and Russian). |
drift/ | The program itself (drift.exe / drift) and everything it needs. Do not change anything inside. |
Source code, .spec files and build scripts are in the project repository; how to build — in
packaging/BUILD.md.